
I made a little challenge for myself this weekend. Because preparing for a big move and taking care of my people leaves tons of extra time everyday. heh heh heh.
My challenge was pretty simple though- to actually use some of the ideas I have pinned to my boards on Pinterest and embark on a pinject once a week. (isn't that cute? I just made a word!) I have used a couple of the recipe ideas and so far all have been hits. Which is great because I have heard a couple sad stories about 'pinterest gone wrong' (so I'm paraphrasing here) and I am sure my day is coming. FYI....those that have pinned the monkey bread recipe from biscuits-- those got a bad review.
Sidetracked. Bringing it back in.
This weeks project was a cute idea I saw (and pinned) that focused on positive reinforcement. It was a cute little project and seemed like a good fit for where I am right now with the kids. With school work, sports, and trying to maintain a tidiness as we prepare to move, I feel like they tend to get called out for their less than stellar moments more than they do their wonderful ones. And that needs to be remedied.
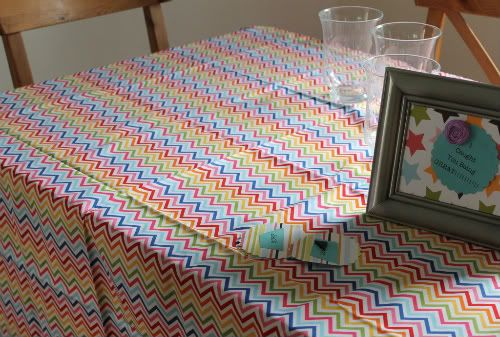
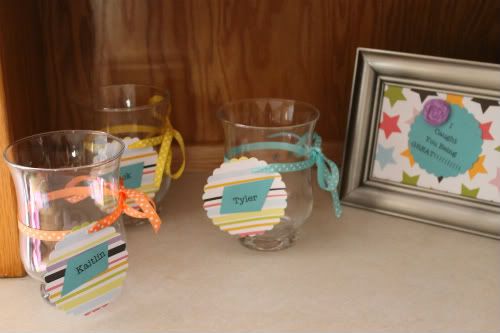
Enter the jars. The "I Caught You Being Great!!!!" jars. We already have a way of tracking follow-through on responsibilities and such, so this is all for the extra stuff. These jars are for those little moments when we catch our kids going out of their way to help, be kind, do something thoughtful, or maybe just pick up something without being asked. When we "catch" them, we will put a big star in the jar, and when they have so many stars, they can redeem them for something special. Jeremiah and I still need to talk about the reward system and what the stars will equate to, because once we say it, we have one child who will hold us to it. Those of you who know my kids know exactly which one I am talking about :)
To make this little project:
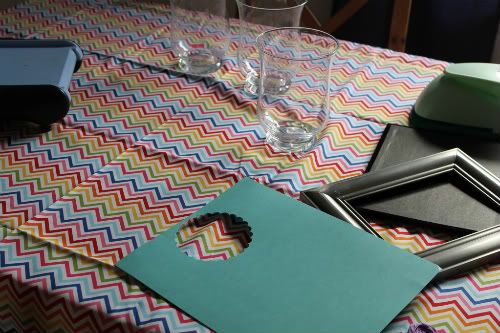
Jars or glasses, something clear so the kids can see their stars
Ribbon or Twine
Card Stock or Scrapbook Paper, for labels
Frame or stand, to announce what the jars are for
I used hurricanes that were part of the table centerpieces from our wedding reception I had stored away. (you say hoarder, I say tomato non-waster). I got those out and cleaned them up (though apparently, I did not clean them up because they look a little spotty.)

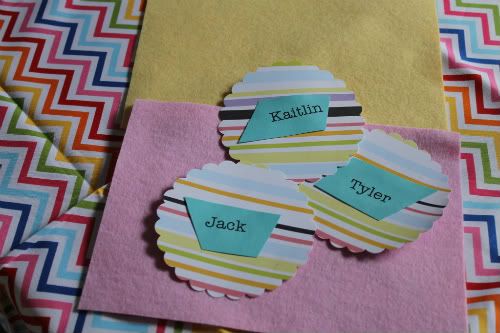
I then typed up the "I Caught You Being Great!!!!!!" along with my kids names, and then printed them up on cardstock. I did not do a jar for Everleigh because she is super obedient and is always going above and beyond what is asked of her. Or because she is just 1. It's one of those.....
Then came the cutting out. I was going to use my sizzix and a big flower shape, but Tyler wanted to do the punching out so I let him choose. Apparently, punching something is more fun than crank, crank, cranking some paper.
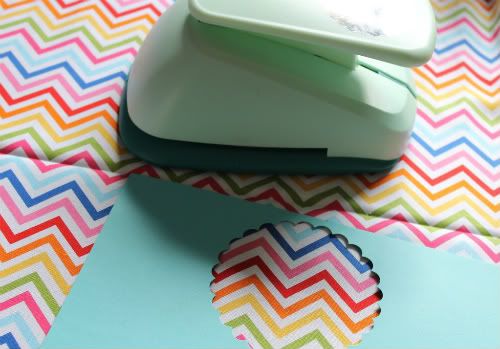

The thing about letting kids build their confidence while helping mama with a project....you kinda have to let go of how you envision the finished product. In all fairness to Tyler, I did not give much instruction about centering the punch out over the words. There was quite a bit of space on the top of this one. So to remedy this, I hot glued a rolled flower I had in my stash from hair-pretty making, to make the punched-out phrase look a little more balanced.

Then Tyler cut out their names. I told him to use neat shapes, and he did! Then we glued their names on to the scalloped circles we had already cut out from scrapbook paper. I laid some felt down because the patterns were a little busy. And also, I had planned on using the felt to make some flowers for their name tags, but I realized Evie had been napping for almost two hours and I wanted to get the main part of the project done before I got carried away.
Then we moved on to the backing for the "I Caught You Being Great" scalloped circle. Since I glued the rolled flower to the paper, I took the glass out of the frame to allow for the dimension of the flower. I used the plastic/glass thing as my template to cut paper for the backing. Tyler took this picture for me :)

Then we moved on to the backing for the "I Caught You Being Great" scalloped circle. Since I glued the rolled flower to the paper, I took the glass out of the frame to allow for the dimension of the flower. I used the plastic/glass thing as my template to cut paper for the backing. Tyler took this picture for me :)

Some more hot glue, and the frame was complete.

The I got my ribbon out to attach the the kids names to each jar.

I have no idea what that black triangle this. Really. No idea where that came from.

Yay! A project done within a naptime.....and that's after I did dishes, helped with homework, and cleaned the kitchen up. Go me!!
I originally put them on a tray, but thought it was too crowded, so I took them off.

And let me tell ya'-- it's already a hit! My kids are so eager for me to 'catch' them, that one is sweeping and one is folding laundry. Sweet!!!
Do you have pinterest projects you've done lately that you'd like to share? If so, I'd love to know about them!!!
Okay, I gotta run. I have some stars to cut out!
I am linking up to:


I originally put them on a tray, but thought it was too crowded, so I took them off.


And let me tell ya'-- it's already a hit! My kids are so eager for me to 'catch' them, that one is sweeping and one is folding laundry. Sweet!!!
Do you have pinterest projects you've done lately that you'd like to share? If so, I'd love to know about them!!!
Okay, I gotta run. I have some stars to cut out!
I am linking up to:
No comments:
Post a Comment